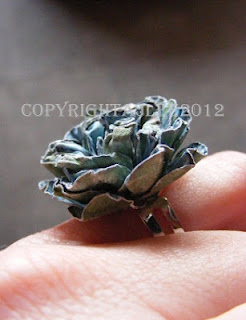
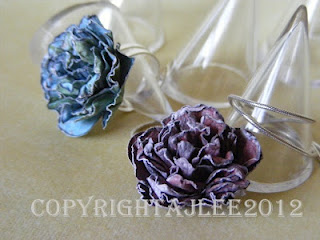
Last week I was having a little bit of a play with paper flowers, the intention being to add to my Floral Fancies website (yes I know, it's looking a bit neglected...but I'm actually having issues with uploading images on there, so please be patient). I was testing out different size and shaped flower rubber stamps images, two of which happen to be from the Tatty Button range, and I ended up using them to create a fun little costume jewellery ring....so it only seemed right to blog post it here.
No. 5 - Paper Flower Ring
For this flower I used two stamp images which can be found on the Tatty's Flowers plate TB16
The techniques is one you will have seen on the blog before - my shabby chic paper flower using a wet technique found HERE
Other materials used -
Good quality double sided printed card/paper approx 220gsm
mini metal split pin (paper brad)
silver plated ring shank with flat base
Pinflair gel glue
water in a fine mister
The images were stamped out as follows - three of the flower with the circle centre detail and four of the plain image...and all layered up with all the plain ones on the bottom, and the button flowers on the top. A mini metal brad/split pin was fixed through the centre to attach and secure them all together and the flower was then formed as per the above technique - by dampening with water, carefully scrunching up, opening out and allowing to dry to harden up and set in the desired shape.
Once completely dried (the process can be speeded up with a heat gun) I trimmed the excess metal off the ends of the split pin using jewellers metal snips and adhered the flower to the ring shank. The ring shank used was quite thin and delicate and the split pin ends slightly stuck out too far each side so were trimmed to neaten it up and prevent any sharp edges protruding out. This may not be necessary on larger ring shanks, so it pays to just line up the flower onto the ring first to check, before cutting and glueing.
If you're wondering why I used two different flower images...well, I actually had three attempts at this flower...checking to see how each stamp shape reacted to the wet technique. If you study the original technique you will notice the best flower shape achieved uses flower shapes of differing and graduating sizes (largest at the bottom, smallest to the top). Using just the plain flower image gave an ok flower...but not a brilliant flower - too bulky to use on the ring. The top/inner segments proved too difficult to wet and manipulate into a tight centre but the outer segments were very pleasing and held their shape really well. A flower made out of purely the 'center detail' flower image was too delicate to take the water and fell apart during the scrunching up process....this was because the petals of each shape were just too narrow and once wet, ripped easily at the base during manipulation and were too small to form a decent sized outer petal. However, a combination of them both resulted in a very nice little flower..the button image used for the inner segments were small enough to scrunch up tightly and the plain image shape strong and big enough to create a full shape and support as the outer petals.
So, there you go...a simple and fun little novelty ring....I shall enjoy wearing this! One thing to bear in mind however is that this, after all is still paper and quite delicate and will damage easily, so only really intended as an occasional wear costume jewellery piece...certainly not one for wearing while weeding the flower beds! I have actually considered strengthening the flower and prolonging wearability by dipping in glaze/UTEE - this will also alter the look and create a glossy finish. One experiment to try another day methinks!
...and now...a quick add on to the post....
Instead of using a split pin, I used a silver plated head pin (jewellery finding) with a small plastic bead attached. The petals were formed around the bead and the excess wire out of the back formed into a ring (using round nosed pliers) to act as a bail for a chain.


